
Using the Kayana application on Stripe S700/ S710 Terminal
Last updated Nov 28, 2025
Using Your Kayana App on the Stripe S700 Terminal
This guide explains all the functions of the Kayana application pre-installed on your Stripe S700 card reader, from basic hardware to running reports.
About Your Stripe S700 Terminal
Before you begin, here are a few key points about the Stripe S700 Terminal device:
- Charging: For best results, use the 12W AC power adapter that came with your reader. A standard laptop USB port may not provide enough power.
- Battery Status: You can check the battery level via the charging LED indicator (Flashing Green = Charging, Solid Green = Full, Red = Critically Low).
- Automatic Updates: Leave the device turned on and connected to power overnight. It receives automatic software updates and restarts daily at midnight for security.
- Keep it Dry: The reader is not waterproof. Keep it away from all liquids to prevent damage.
Step-by-Step: The Kayana Home Screen
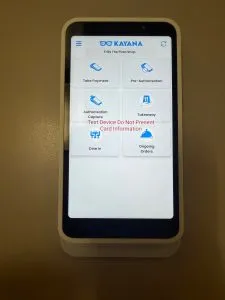
- Understand the Top Bar
- Tap the Menu icon (☰) in the top-left corner to open the administrative menu for settings, reports, and transaction history.
- Tap the Refresh icon (↻) in the top-right to manually sync the terminal with the Kayana system and pull in any updates.
- Review the Main Functions This screen gives you six buttons for your main tasks: Take Payment, Pre-Authorisation, Authorisation Capture, Takeaway, Dine in, and Ongoing Orders.
Step-by-Step: Taking a Payment
Use this for a quick, simple sale where you manually type in the amount.
- Select "Take Payment"
- From the home screen, tap the Take Payment button.
- Enter the Amount
- Use the keypad to enter the total amount (e.g.,
£25.50). - Choose Payment Type
- Select an option for the bill: Pay in Full (default), Custom Splits, or Equal Split.
- Process the Payment The "Sale" screen, showing the number pad, amount entry box, and options for "Pay in Full," "Custom Splits," and "Equal Split.”
- Tap the green Take Payment bar at the bottom. The Stripe S700 Terminal device will then prompt the customer to present their card.
Step-by-Step: Placing a "Dine in" Order
Use this when a customer is sitting at a table.
- Select "Dine in"
- From the home screen, tap the Dine in button.
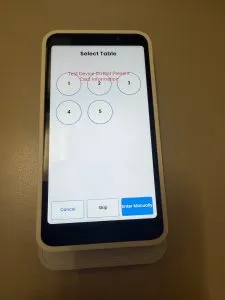
- Choose a Table
- On the "Select Table" screen, tap a pre-set table number, tap Enter Manually to type one in, or tap Skip.
- Build the Order
- You will see the Menu. Tap categories to find items.
- Tap on items to add them to the order.
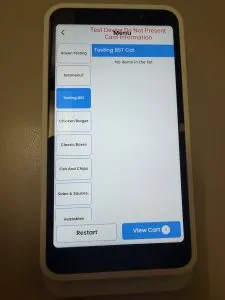
- Complete the Payment
- Tap the View Cart button to review the order, make changes, and proceed to Checkout.
Step-by-Step: Using Pre-Authorisation (Tabs)
Use this to "hold" funds for a tab or deposit.
- Start the Pre-Auth
- From the home screen, tap Pre-Authorisation.
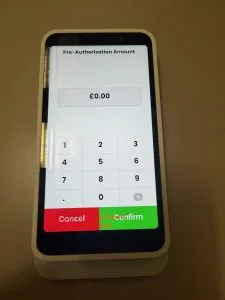
- Enter the amount you wish to hold (e.g.,
£50.00) and tap the green Confirm button. - The customer then presents their card to create the hold. No money is taken at this time.
- View Ongoing Orders
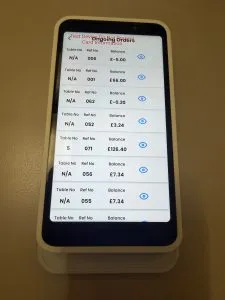
- From the home screen, tap Ongoing Orders. This screen shows all active tabs and orders that have not yet been fully paid.
- Capture the Payment on Authorisation Capture
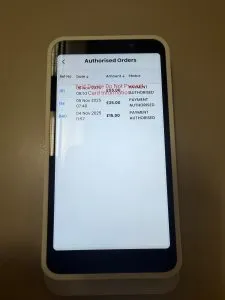
- When the customer is ready to pay, tap Authorisation Capture from the home screen.
- Select the order from the list to finalise it and charge the customer.
Step-by-Step: Using Admin Functions & Reports
Access these functions from the main side menu.
- Open the Main Menu
- Tap the Menu icon (☰) in the top-left corner of the home screen.
- View Transactions
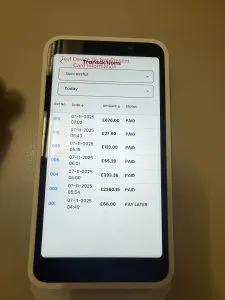
- Tap Transactions to see a complete history of all payments on this terminal.
- You can filter this list by status (e.g., "Successful") and by date ("Today," "Yesterday").
- Run Reports (Summary & Z-Report)
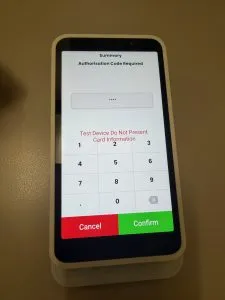
Tap Summary or Z-Report. You will be prompted to enter an "Authorisation Code Required". Enter your admin PIN and tap Confirm.
- Summary: Provides a simple report of Sales, Refunds, and Total Takings for this terminal only on a selected date.
- Z-Report: This is your detailed end-of-day report. It breaks down all sales by Payment Source (EPOS, Kiosk, Terminal, etc.) and payment type.
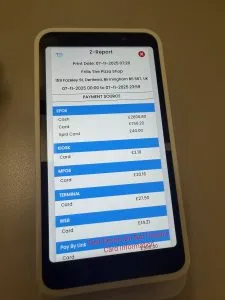
📧 Tip: You’ll notice a small email icon at the top-left corner of the report screen. Tap this icon to send the report directly to your registered email address, so you can keep a digital copy or share it easily with your accounts team.
- Configure Settings
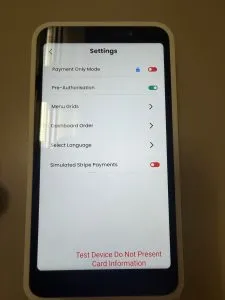
- Tap Settings to configure the terminal.
- Here you can toggle the Pre-Authorisation button on or off, change the Language, and manage other device settings.
Next Steps
Before using your Stripe S700 terminal with the Kayana app, make sure Stripe is selected as your payment service provider in Partner Admin. Follow the “Selecting Stripe as the New PSP on Kayana Partner Admin” guide to complete the setup and ensure your terminal is fully connected for live transactions.